# Commandes General
# Lister les services
Sur CentOS/RedHat Tous :
```bash
systemctl list-units --type service --all
```
En cours :
```bash
systemctl list-units --type service --all | grep running
```
Sur Debian :
```bash
service --status-all
```
# Quelques commandes
Commandes simples :
\\ : utilisation des apostrophes
Lire les fichiers : cat, more, less
nmtui : modifier connexion via interface graphique
ctrl + alt + f1 ou f2 : changer de terminal
\# : utilisation compte root
$ : utilisation autre utilisateur
~ : répertoire de connexion
ctrl + s : Pause du terminal
ctrl + q : Reprendre le terminal
ctrl + w : Effacer le mot
ctrl + i : efface l'affichage
ctrl + u : efface ligne entière
man -k : recherche pages du manuel associés à un mot
who : liste utilisateurs connectés
whoami : affiche utilisateur actuel connecté
finger : affiche informations plus précises sur l'utilisateur connecté
pwd : affiche répertoire courant
Cd ~ => renvoie dans le répertoire /home personnel.
/bin/bash : Shell par défaut | Boîte de l'invite de commande.
passwd : modifier mot de passe | commandes liés au mot de passe
passwd -l : verrouiller compte
passwd -u : déverrouiller compte
passwd -d : désactiver saisie du mot de passe pour un compte
wc : compter le nombre de lignes, mots, caractères contenus dans un fichier.
wc -l -w -c (line, word, caracter)
env : affiche varaibles d'environnement
echo : afficher valeur d'environnement
date : affiche date
exit or logout : déconnecter utilisateur
which \[commande\] : affiche le chemin complet d'une commande
Changement de valeur d'une variable d'environnement
export PS1=’\[\\u@\\h \\W \\t\]$’
Export valide la nouvelle variable.
$TMOUT : Variable qui déconnectee automatiquement au bout d'un temps défini.
La commande export ne marche que pour la session en cours. (temporaire)
==Recherche==
\* : substitue le caractères générique ? par n'impoorte quel caractère.
\[\] : remplace le caractère par un des caractères donnés. Exemple
\[abc\] remplace le caractère par a ou b ou c
\[f-z\] : caractère entre f et z. Respect de la casse.
exemple : ls \[fr\]?tab
! : cherche les caractères ne se trouvant pas entre les
{} : Cherche tous les noms de fichiers commençant par une chaîne de caractères au lieu
d'un seul caractère.
Avec des doubles apostrophes, les caractères spéciaux sont interprétés mais pas le \* .
alias : remplace une ligne de commandes complexe par son alias.
pour l'avoir de manière permanente pour tous les utilisateurs, l'ajouter dans .bashrc
qui se trouve dans le dossier de connexion de l'utilisateur.
unalias -a nom\_alias : supprimer alias
type : affiche les informations à propos d'une commande et son interprétation.
cat : sert à lire un fichier
whereis : localiser rapidement une commande externe ainsi que les fichiers
aide et sources associées.
source .bash\_profile : recharger le fichier profile sans se déconnecter.
set -o : affiche l'état (actif ou inactif) des options
set -o \[nom\_option\] : activer
set +o \[nom\_option\] : désactiver
Tous les fichiers qui commencent par p ou se terminent par d :
ls -d {p\*,\*.d}
==Avancé==
processus associé à des descripteurs de fichiers.
point d'entrée = paramètre rentré sur le clavier
sortie = résultat affiché à l'écran
Entrée (0) => Processus => Sortie (1)
||
Erreur (2)
< : rediriger l'entrée
> : rediriger la sortie vers un fichier
>> : permet d'ajouter dans un fichier existant
2> : redirection de l'erreur standard
n>&m : avoir une sortie + erreur dans un seul fichierr
où n est numéro du descripteur à rediriger et m : numéro de celui vers
lequel il faut renvoyer les données . exemple : Ou > ficsortie 1>&2
/dev/null : puit sans fond. Tout ce qui est envoyé est supprimé du système
exemple : ps -ef > /tmp/test
ls bin dev bleu > ficout 2>> ficerr2
/dev : fichiers qui sont des pointeurs vers des périphériques
touch : permet de changer l'heure du fichier et créé un fichier vide.
tubes (pipe) : |
tee : lis l'entrée, génèree le fichier et effectue une copie sur la sortie intermédiaire
grep : filtre et garde que ce qui contient après ce paramètre
su : switch user | changer d'utilisateur
su - \[nom\_user\] : tirer permet de garder l'environnement de l'utilisateur actuel
Lancer une commande en tant qu'utilisateur test :
su - test -c "ps -ef"
chaque commande lancé via su crée une exécution en shell.
sudo : exécution de commandes en tant que sans élévation de compte /etc/sudoers
\[Commandes Avancées\]
Dmesg : verbosité du noyau. Les informations sur des périphériques attachés ou détachés apparaissent dedans.
Fdisk –l : commandes de table de partition
mount : monter le périphérique à un répertoire. | affiche la liste des montages
df : fourni la quantité d'espace occupé des systèmes de fichiers.
mkfs -t ext4 /dev/sdx : formater au format ext4
editeurs de texte : vi, nano, emacs
cd - => renvoie dans le répertoire précédent
file : permet de déterminer le type d'un fichier
stat : indique les informations du bloc où est stocké le fichier
mkdir -p : crée arborescence du répertoire
cp -R : Copier contenu d'un répertoire avec les droits associés.
mv : renommer ou déplacer fichiers
rename : renommer fichier
find : rechercher des fichiers
exemple : find / -name
find -size +1M : fichiers de plus d'un megaoctet
find -mtime : heure de modification
Grep permet de filtrer des lignes.
Grep –i => prend en compte les minuscules et majuscules
Grep –l => affiche uniquement les noms des fichiers possédant des lignes qui correspondent à la valeur donnée.
Cut => supprimer une partie de chaque ligne d’un fichier
Sort => trier les lignes d’un fichier.
Head => consulter le début d’un fichier
Tail => consulter la fin d’un fichier.
La commande watch permet d’exécuter un programme périodiquement en affichant le résultat à l’écran
ln : lien dur (hard link) -> seconde entrée pointant vers le même inode
ln -s : lien symbolique -> raccourci
# MAIL
Pour voir la file d'attente :
```bash
mailq
```
Pour le journal des logs :
```bash
journalctl -u postfix
```
Pour forcer le renvoi des mails bloqués dans la file d'attente :
```bash
postfix flush
```
Pour tester l'envoi :
```bash
Mail email@addresse.com
```
et suivre les étape
Pour reload le service
```bash
postfix reload
```
# Lancer une commande active même après la déconnexion
Précéder la commande par la commande nohup
S'il est nécessaire de récupérer la console, terminer la ligne avec une esperluette & exemple :
```bash
nohup wget ftp://...../Fedora-8-i386-rescuecd.iso &
```
La sortie de la commande est loggué dans un fichier nohup.out
il est possible de consulter soit en direct en lançant immédiatement
```bash
tail -f nohup.out
```
Soit après coup :
```bash
less nohup.out
```
# NTP
Pour voir l'heure et le status du service
```bash
/etc/init.d/hwclock.sh show
```
Pour checker l'heure du matériel :
```bash
date; hwclock
```
Pour synchro :
```bash
hwclock --systohc
```
Pour debugguer :
```bash
hwclock --systohc --debug
```
# Drop RAM SWAP CPU & MEM
lister les process qui occupe le swap :
```bash
for file in /proc/*/status ; do awk '/VmSwap|Name/{printf $2 " " $3}END{ print ""}' $file; done | sort -k 2 -n -r | less
```
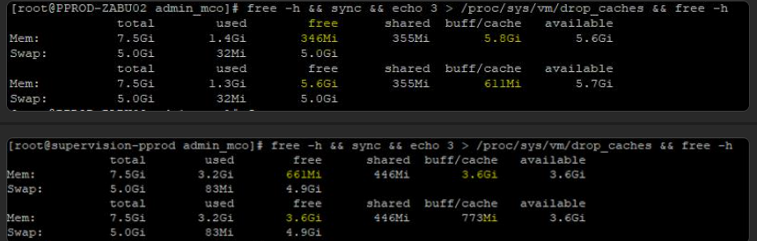
DROP mémoire cache + voir résultat
```bash
free -h && sudo sysctl vm.drop_caches=3 && free –h
```
Relancer le swap
```bash
sudo swapoff –a && sudo swapon -a
```
#### **Problème lié au swap**
Déplacer le cache de Swap vers la mémoire si elle est pas trop sollicitée en exécutant la commande :
```bash
swapoff -a
```
changer le swappiness à 10 au lieu de 40 (valeur recommandée sur postgre) ce qui a permis de soulager le swap
il ne sera sollicité que la mémoire passe en full (ce qui n'était pas le cas avant ce changement, le swap se remplit fréquemment même si la RAM est vide )
Pour modifier la valeur sans redémarrer le système d'exploitation, exécutez la commande suivante :
```bash
sysctl -w vm.swappiness=10
```
Pour modifier la valeur temporairement (après le redémarrage la valeur sera sautée)
```bash
htop
```
Pour reloader la config :
```bash
sysctl --system
```
une fois le swap vidé passer la commande suivante pour réactiver le swap :
```bash
swapon -a
```
La config swappiness se trouve :
/etc/sysctl.conf
droper cache mem et swap autrement :
```bash
sync; echo 3 > /proc/sys/vm/drop_caches
```
[](https://cavallone.fr/uploads/images/gallery/2024-11/lFBYlh5gaCvAGJHl-image.png)
trier le CPU ou la mémoire sur la machine :
top ou htop
commande avancée pour trier la mémoire:
```bash
ps -eo size,pid,user,command --sort -size | awk '{ hr=$1/1024 u; printf("%13.2f Mb ",hr) } { for ( x=4 ; x<=NF ; x++ ) { printf("%s ",$x) } print "" }' | cut -d "" -f2 | cut -d "-" -f1
```
[](https://cavallone.fr/uploads/images/gallery/2024-11/p73behMJXXpG1apj-image.png)
autres commande pour CPU et mem triez par top:
```bash
ps -eo pid,user,comm,%mem --sort=-%mem | head -n 6
```
```bash
ps -eo pid,user,comm,%mem --sort=-%cpu | head -n 6
```
Vous pouvez faire des teste de stress sur une machine pour voir comment elle réagit via :
```bash
Yum install stress
```
Commande stress mémoire :
```bash
stress --vm 1 --vm-bytes 1G --timeout 30s
```
# Astuces Cron
Vérifier la crontab système :
```bash
cat /etc/crontab
```
Lister les crontab de tous les utilisateurs
```bash
for user in $(cut -f1 -d: /etc/passwd); do echo $user; crontab -u $user -l; done
```
Lister les crontab d'un user spécifique
```bash
crontab -l -u "user"
```
CRONTAB
mm hh jj MMM JJJ tâche
\# Example of job definition:
\# .---------------- minute (0 - 59)
\# | .------------- hour (0 - 23)
\# | | .---------- day of month (1 - 31)
\# | | | .------- month (1 - 12) OR jan,feb,mar,apr ...
\# | | | | .---- day of week (0 - 6) (Sunday=0, Monday=1, and so on)
\# | | | | |
\# \* \* \* \* \* user-name command-to-be-executed
crontab -l
ls -al /etc/cron.\*
cat /etc/cron.d/\* | grep "votre recherche"
Valider la planification avec crontab guru :
[https://crontab.guru](https://crontab.guru)
Aide à la création de la cron:
[https://crontab-generator.org/](https://crontab-generator.org/)
# Extraction link web page
[](https://cavallone.fr/uploads/images/gallery/2024-10/OEDBmIykIQV84pw2-image.png)
[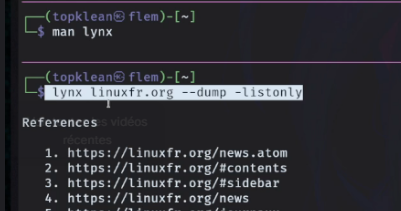](https://cavallone.fr/uploads/images/gallery/2024-10/bEsgI7iJWSmi2d7f-image.png)
# Rechercher des fichier : find/locate/size
• Rechercher tous les fichiers avec l'extension .txt dans le répertoire courant :
```bash
find . -name "*.txt"
```
• Rechercher tous les fichiers avec l'extension .txt dans tous les sous-répertoires du répertoire courant :
```bash
find . -name "*.txt" -type f -exec ls -lh {} \;
```
• Rechercher tous les fichiers dont la taille est supérieure à 100 Mo :
```bash
find . -size +100M
```
• Rechercher tous les fichiers modifiés au cours des 7 derniers jours :
```bash
find . -mtime -7
```
Pour utiliser la commande locate, vous devez d'abord vous assurer que la base de données locate est à jour. Pour ce faire, exécutez la commande suivante :
```bash
sudo updatedb
```
Une fois la base de données locate à jour, vous pouvez commencer à rechercher des fichiers. La syntaxe de base de la commande locate est la suivante :
```bash
locate [options] nom_de_fichier
```
Par exemple, pour rechercher tous les fichiers avec l'extension .txt, vous pouvez exécuter la commande suivante :
```bash
locate *.txt
```
Recherche dans l'historique des commande taper sur le shell:
```bash
CRTL + R :
```