Nous pouvons ignorer les erreurs checksum
Démarrer le service, l'ajouter au démarrage automatique et vérifier le démarrage[](https://cavallone.fr/uploads/images/gallery/2024-10/0APwR6uCvu9Tdhcz-image.png) Copier le sample de la base et attribuer les droits : [](https://cavallone.fr/uploads/images/gallery/2024-10/GHcbxl0ictEymSfO-image.png) Créé les schéma pour le ldap : [](https://cavallone.fr/uploads/images/gallery/2024-10/wqWswXOl5DSi43dl-image.png) [](https://cavallone.fr/uploads/images/gallery/2024-10/nwKxrIaG7NBysFDE-image.png) # Passage ldif, changement des information Passage d'un ldif qui parvient d'une autre entité, il faut passer ce script pour retirer les informations du fichier ldif pour ne pas avoir l'erreur **CONSTRAINTE 61** ```bash #SCRIPT #!/bin/bash echo "inupt file LdapExt-Prod.ldif "cat $1 | grep --binary-files=text -vi structuralObjectClass > tmp1.ldif cat tmp1.ldif | grep --binary-files=text -vi entryUUID > tmp2.ldif cat tmp2.ldif | grep --binary-files=text -vi creatorsName > tmp3.ldif cat tmp3.ldif | grep --binary-files=text -vi createTimestamp > tmp4.ldif cat tmp4.ldif | grep --binary-files=text -vi entryCSN > tmp5.ldif cat tmp5.ldif | grep --binary-files=text -vi modifiersName > tmp6.ldif cat tmp6.ldif | grep --binary-files=text -vi modifiersName > tmp7.ldif cat tmp7.ldif | grep --binary-files=text -vi modifyTimestamp > tmp8.ldif cat tmp8.ldif | grep --binary-files=text -vi contextCSN > $1-final.ldif echo "conversion en cours ...\n ...\n...." echo " fin Conversion , OutPUT file : import-v2.ldif " # + suppression de l'ou et de l'admin ``` **Il faut aussi ouvrir le ldif et retirer les 2 premieres description ADMIN + OU à la fin du script .**[](https://cavallone.fr/uploads/images/gallery/2024-10/1FUfo6i5MUpNtmxN-image.png) # OpenLdap commande 1. **`ldapwhoami -x -D "uid=*** -W -v`** - Cette commande permet de s'authentifier avec l'utilisateur spécifié et affiche l'identité LDAP de l'utilisateur actuel (fonction `whoami`). 2. **`ldapsearch -x -LLL -D "cn=admin,dc=***,dc=***" -W -b "ou=extern,ou=users,dc=***,dc=***" "(uid=*)" | grep dn`** - Effectue une recherche dans l'annuaire LDAP en filtrant sur l'attribut `uid` et extrait les entrées de type `dn` (distinguished name). 3. **`cat comptes_geode_extern.ldif | grep -5ni granet`** - Affiche les 5 lignes avant et après chaque occurrence de "granet" dans le fichier `comptes_geode_extern.ldif`. 4. **`ldapadd -x -D "cn=admin,dc=***,dc=***" -W -f comptes_geode_extern.ldif`** - Ajoute des entrées LDAP à partir du fichier `comptes_geode_extern.ldif`. 5. **`ldapdelete -x -r "ou=users,dc=***,dc=***" -W -D "cn=admin,dc=***,dc=***"`** - Supprime des entrées récursivement dans l'OU `users` de l'annuaire LDAP. 6. **`ldapsearch -x -LLL -D "cn=admin,dc=***,dc=***" -W -b "cn=admin,dc=***,dc=***" "(objectClass=*)"`** - Effectue une recherche LDAP sur l'OU admin et récupère toutes les entrées de ce conteneur. 7. **`ldapwhoami -x -D "cn=admin-byzance,dc=***,dc=***" -W -H ldap://***`** - S'authentifie sur un serveur LDAP distant et affiche l'identité LDAP de l'utilisateur. 8. **`ldapsearch -x -H ldap://*** -D "cn=admin,dc=***,dc=***" -W -b "dc=***,dc=***" "(objectClass=*)" > backup-jimmy-test.ldif`** - Effectue une recherche sur le serveur LDAP distant et exporte les résultats dans un fichier `backup-jimmy-test.ldif`. 9. **`ldapsearch -x -H ldap://*** -D "cn=admin,dc=***,dc=***" -W -b "ou=vm,ou=users,dc=***,dc=***" "(objectClass=*)" > ou-vm.ldif`** - Recherche les objets dans l'OU `vm` de l'annuaire LDAP distant et exporte les résultats dans le fichier OU-VM.ldif. 10. **`ldapsearch -x -H ldap://*** -D "cn=admin,dc=***,dc=***" -W -b "ou=byzance,ou=users,dc=***,dc=***" "(objectClass=*)" | grep -c "^dn: "`** - Recherche les objets dans l'OU `byzance` et compte le nombre d'entrées dans le résultat. 11. **`grep -c "^dn: uid=" OU-FULL-BACKUP-PROD/full-backup-prod-09-09-2024.ldif > directement sur un file.ldif`** - Recherche dans un fichier LDIF et compte le nombre d'entrées de type `dn` pour l'attribut `uid`. # HA / CLUSTER # Keepalived HA Nous avons setup un Keepalived pour les base de donnée avec une VIP (virtual adresse IP), pour qu'en cas de shutdown sur la base de donnée MAITRE, le standby reprennent directement le rélais Configuration numéro 1, MAITRE dans /etc/keepalived/keepalived.conf[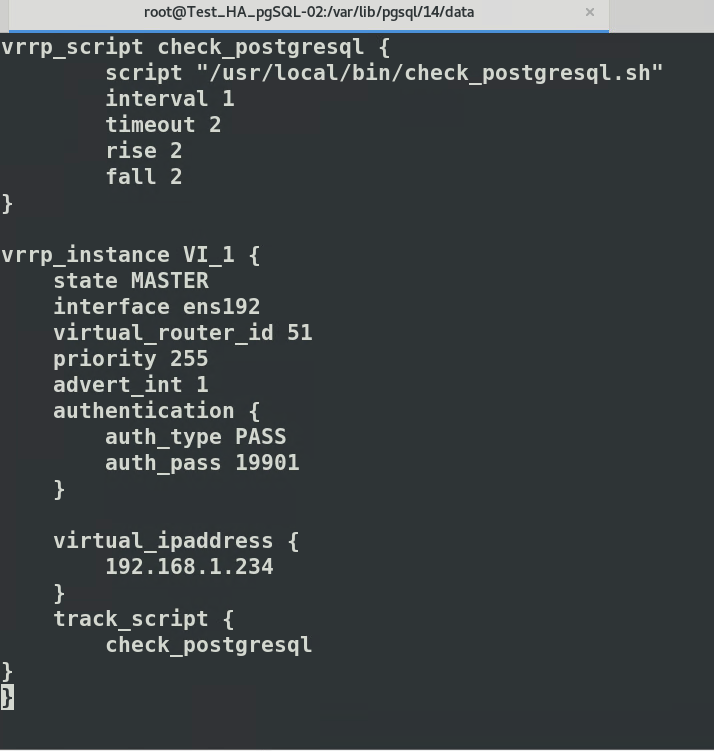](https://cavallone.fr/uploads/images/gallery/2024-10/5xoMmzl8MCRNOGNZ-image.png) Configuration numéro 2, SLAVE dans /etc/keepalived/keepalived.conf [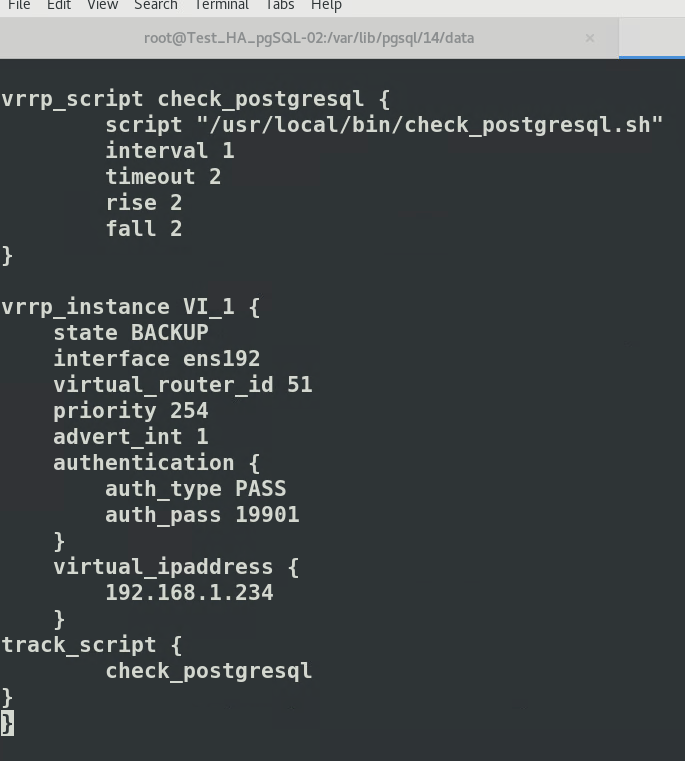](https://cavallone.fr/uploads/images/gallery/2024-10/oVQoAhn8kDHeDdHP-image.png) Nous avons focaliser notre flipping de VIP sur le service Pgsql14 via script : Si il est down sur le maitre, il partira sur les intervalle définit dans le fichier de conf sur le slave. La BDD sera donc hautement disponible le tant de débuger le nœud 1 [](https://cavallone.fr/uploads/images/gallery/2024-10/QRQbeCzdatcIiDc3-image.png) Une meilleur config pour apache 1 / master – check sur le service httpd. [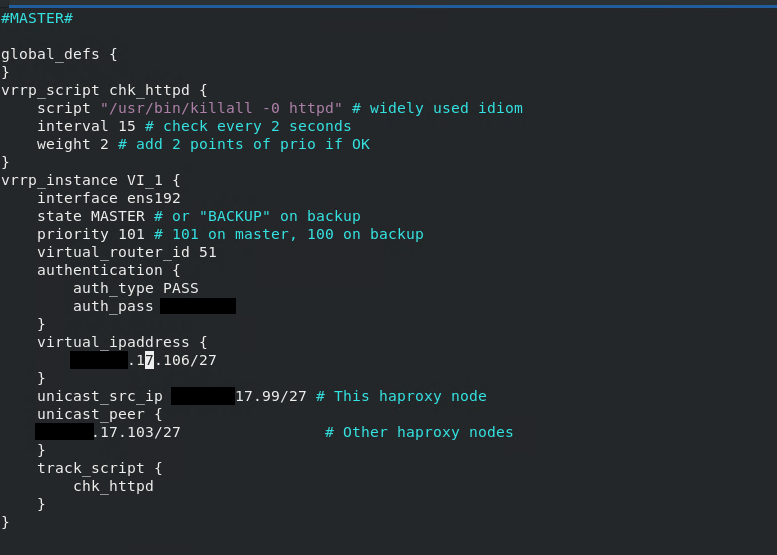](https://cavallone.fr/uploads/images/gallery/2024-10/uAgK91ZbQwCUH85v-image.png) Une meilleur config pour apache 2 / backup – check sur le service httpd. [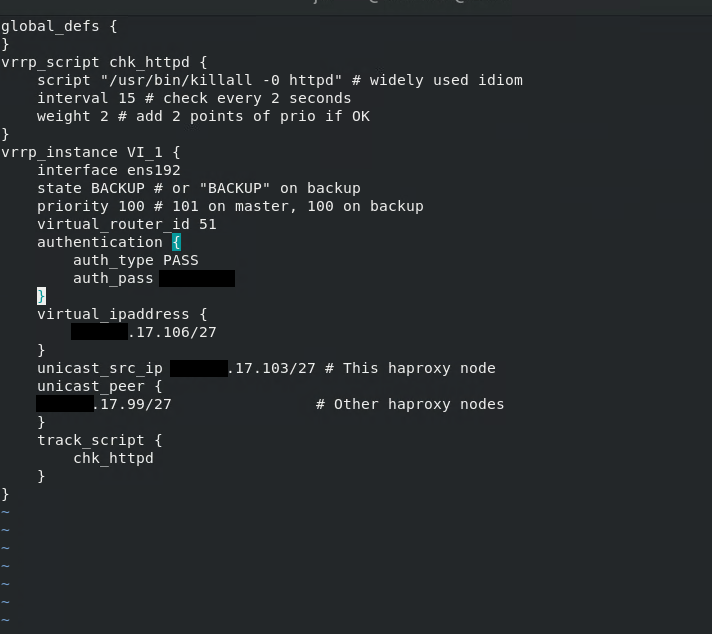](https://cavallone.fr/uploads/images/gallery/2024-10/50xy5DfL4iDloUNO-image.png) # Verifier l'état d'un cluster sous PaceMaker [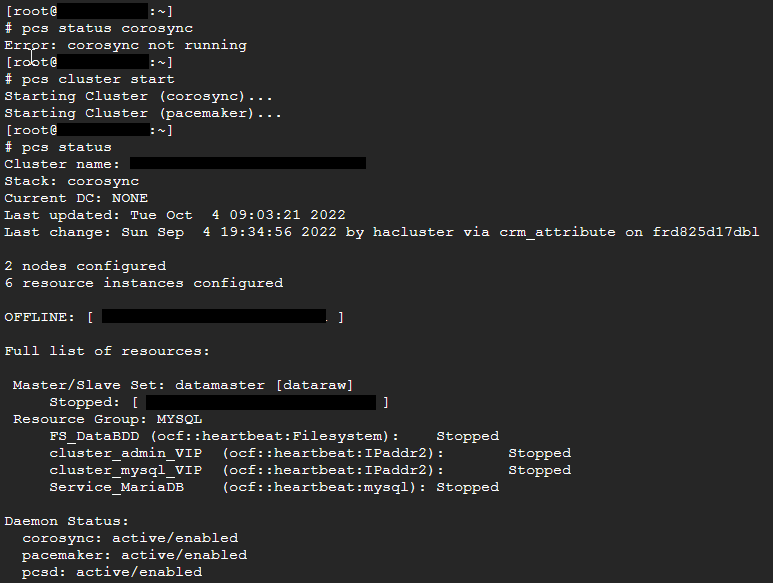](https://cavallone.fr/uploads/images/gallery/2024-10/qAMgl7mXZOkuidT5-image.png) [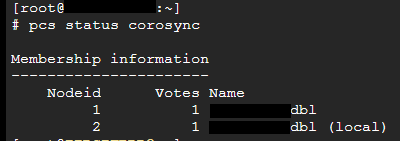](https://cavallone.fr/uploads/images/gallery/2024-10/4Ou5pc78vSnBLQMF-image.png) Pour l'alerte suivante : App-DRBD-Monitor --> DRBD: 1 crit, 0 okay: Le service drbd ne doit pas être démarré manullement : il est géré par pacemaker via les commandes pcs [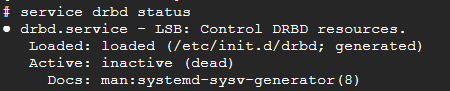](https://cavallone.fr/uploads/images/gallery/2024-10/fM5idsYBQwBL2TL0-image.png) Identifier l'état du cluster : drbdadm status drbdmon (ne doit pas afficher d'alerte ) Mettre les sonde drbd en maintenance et procéder à une resynchronisation drbd [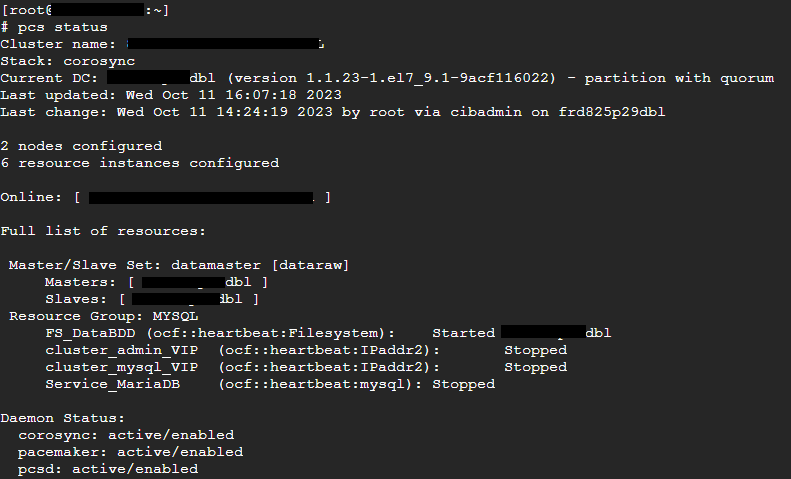](https://cavallone.fr/uploads/images/gallery/2024-10/qUsCbRID6BGifUjt-image.png) [](https://cavallone.fr/uploads/images/gallery/2024-10/FuAytsvFMKmxWbD2-image.png) [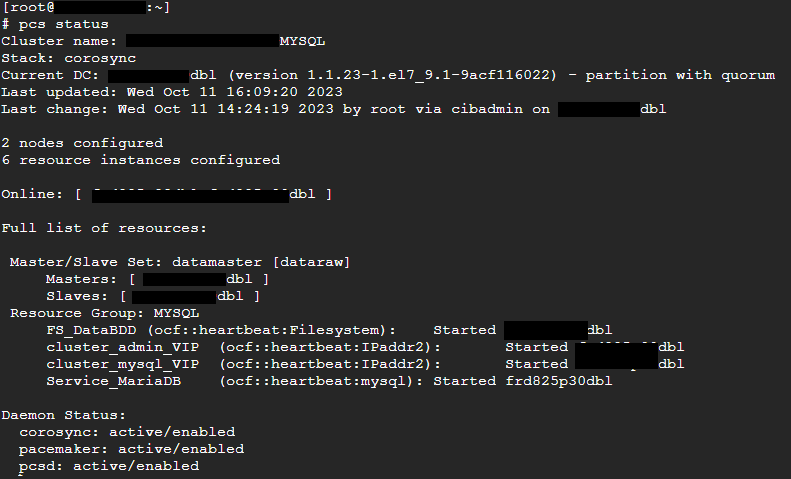](https://cavallone.fr/uploads/images/gallery/2024-10/4nFz4W7JPq8lWHCb-image.png) Déplacement des ressoures action préreboot/maj : Vérifier l'etat du cluster pcs status --full drbdadm status drbdmon (ne doit pas afficher d'alerte ) Si drbd ok: déplacer les ressources sur le nœud sur lequel il n'y aura pas d'opération pcs resource move NOM\_DU\_GROUP\_DE\_RESOURCE (exemple ci dessus : MYSQL ) Vérifier le déplacement des resource avec pcs status mettre le nœud secondaire (sur lequel on va faire la mise à jour ou le reboot) en maintenance pcs node maintenance nomdunoeud mettre ensuite le nœud en standby pcs node standby nomdunoeud procéder aux opérations de maintenance # Correction d'erreur drbd resynchronisation de la réplication Correction d'erreur drbd resynchronisation de la réplication : Identifier le noeud maitre pcs status --full mettre le nœud secondaire en maintenance avec pcs pcs node maintenance nomdunoeudpcs Identifier la ou les ressources drbd avec la commande : drbdadm dump sur le nœud secondaire invalider les données de réplication drbd pour chacune des ressources : drbdadm invalidate Nom\_de\_ressource\_drbd Sur le nœud primaire préparer pour une resynchronisation forcée drbdadm invalidate-remote Nom\_de\_ressource\_drbd Sortir le nœud secondaire de maintenance pcs node unmaintenance nomdunoeudpcs Vérifier la synchronisation drbd sur les deux nœud avec d'un coté : drbdmon et sur l'autre nœud: watch -n1 drbdadm status # HAproxy.conf Config sur les machines proxy [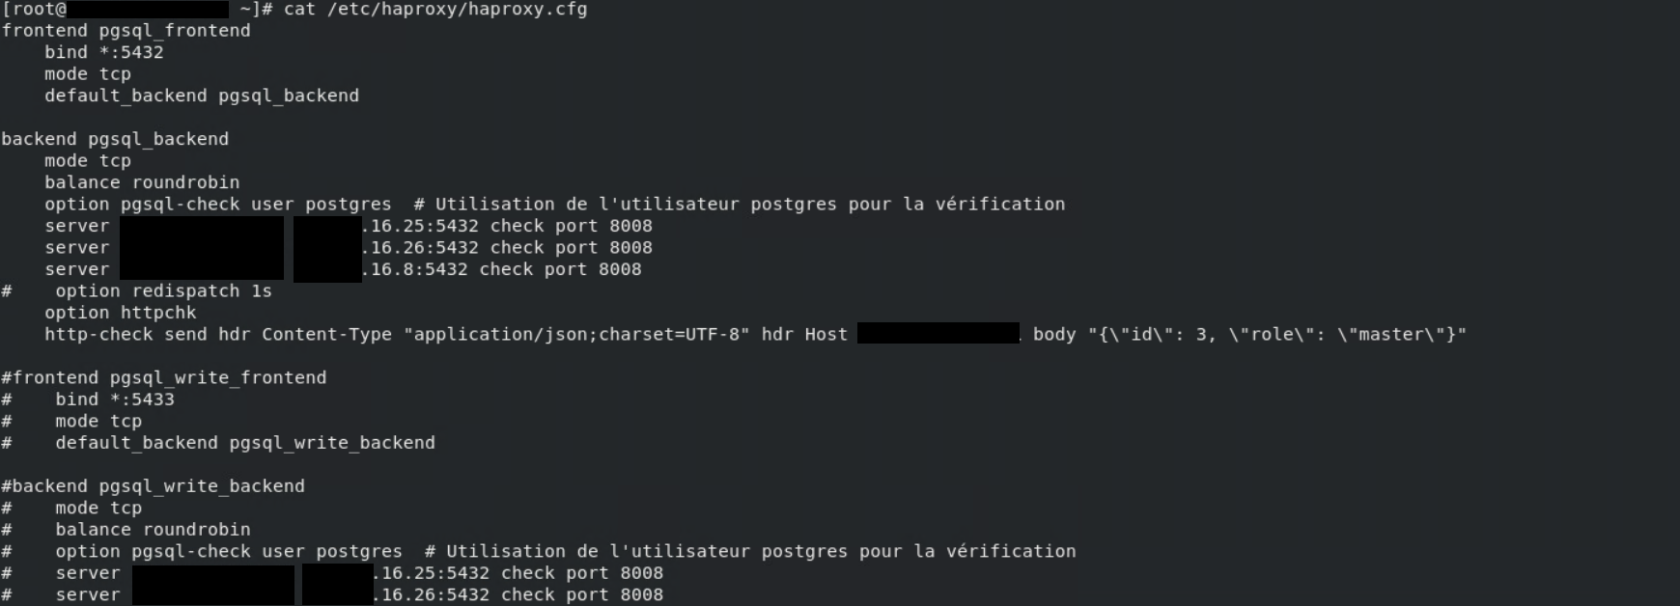](https://cavallone.fr/uploads/images/gallery/2024-10/fqfNQ3cvR0QKSrn4-image.png) Format json pour vérification : [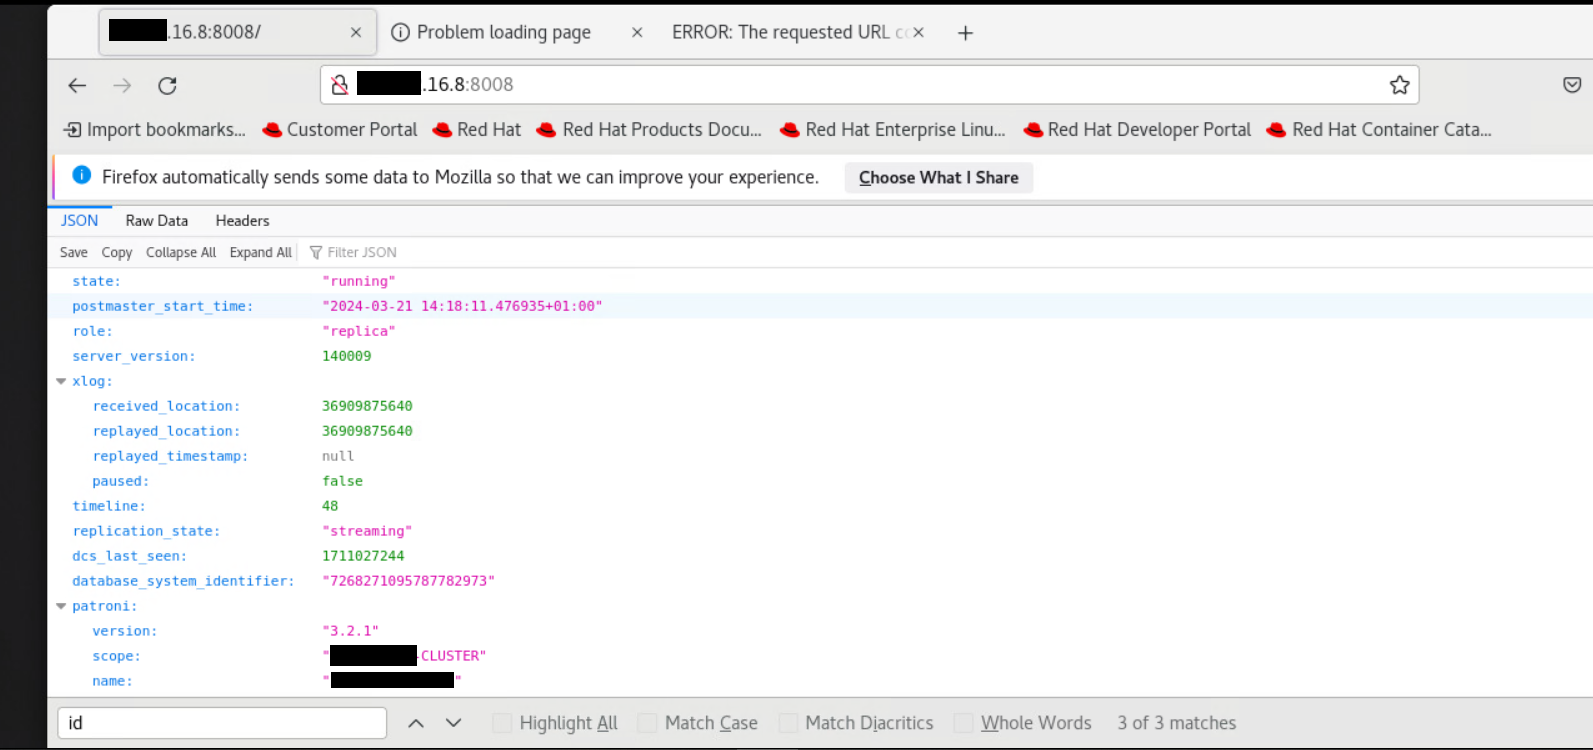](https://cavallone.fr/uploads/images/gallery/2024-10/asIXArEBgmYnA77d-image.png) # Commande Tshoot Cluster NFS/PACEMAKER/COROSYNC lors de l'installation de votre cluster il faut que cette requête soit en état OK sur les 2 nœuds sinon votre cluster ne basculeras pas, j'ai eu le problème sur mes proxy ouvert, j'ai du les désactivé pour que la bascule fonctionne: curl -k https://\*\*\*\*\*.fr:2224/remote/status/ Commande pour cleanup vos ressource si elles sont KO: crm\_resource --cleanup -r p\_drbd\_ha\_nfs crm\_resource --cleanup -r p\_fs\_drbd1 Commande pour disable ou remettre un noeud dans le cluster: sudo pcs cluster standby <nom\_du\_nœud> sudo pcs cluster unstandby <nom\_du\_nœud> disable les ressource sur un noeuds isolé: pcs resource disable p\_exportfs\_openshift\_prod pcs resource disable p\_exportfs\_prod pcs resource disable p\_nfsserver pcs resource disable p\_fs\_drbd1 pcs resource disable p\_drbd\_ha\_nfs crm\_resource --resource p\_drbd\_ha\_nfs --node \*\*\*\*.fr --demote réactiver les ressource sur un noeuds isolé: pcs resource enable p\_drbd\_ha\_nfs pcs resource enable p\_fs\_drbd1 pcs resource enable p\_nfsserver pcs resource enable p\_exportfs\_prod pcs resource enable p\_exportfs\_openshift\_prod crm\_resource --resource p\_drbd\_ha\_nfs --node \*\*\*\*.fr --promote deconnecter ou connecter drbd sur le noeud isolé drbdadm disconnect ha\_nfs sudo drbdadm connect ha\_nfs Forcer la synchronisation avec les données du nœud primaire drbdadm connect --discard-my-data ha\_nfs Status du drbd drbdadm status # Script de Nettoyage ressource sur un cluster NFS Script à appliquer sur une crontab de 24h pour effectuer un nettoyage de vos ressource, si le NFS est consommé fréquemment, toujours choisir la première ressource de votre cluster cela nettoieras le reste à la suite peu importe le nombre de ressource derrière, le script rajoute un print sur des logs si cela a bien fonctionner : ```bash #!/bin/bash # Variable pour le fichier de log LOG_FILE="/var/log/cleanup_p_drbd_ha_nfs.log" # Bloc conditionnel pour exécuter le nettoyage if sudo crm_resource -cleanup -r p_drbd_ha_nfs && sudo crm_resource -cleanup -r p_exportsfs_pprod; then # Si les deux commandes se sont exécutées avec succès echo "$(date +'%Y-%m-%d %H:%M:%S') - Clean up successful" >> "$LOG_FILE" else # Si au moins une des commandes a échoué echo "$(date +'%Y-%m-%d %H:%M:%S') - Clean up failed" >> "$LOG_FILE" fi ``` # Patroni cluster Lister un cluster patroni : patronictl -c /etc/patroni/patroni.yml list [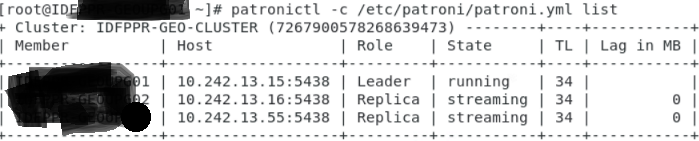](https://cavallone.fr/uploads/images/gallery/2024-11/GDZW0o1on0qB2iXb-image.png) # CONFIG OS # Config template [](https://cavallone.fr/uploads/images/gallery/2024-10/jDEPVkEUFCGAZI6w-image.png) ```bash Cat /etc/ntp/step-tickers Timedatectl status Timedatectl set-ntp true hwclock Iptables -F Rm -fr .bash_history sudo useradd -M -s /sbin/nologin ansible sudo -u ansible ssh-keygen -t rsa ``` # Hiearchy file system /bin : binaire /lib : librairie de programme /boot : fichier du système démarage /usr : /usr/local : /opt : fichier optionnel /etc : editable text configuration /srv : service héberger par d'autre système, http, ftp, cvs, DB /var : donnée type variable, log mail ect /home : donnée aux utilisateurs spécifique /root : donné aux système /tmp : donnée temporaire, pour pouvoir créer un programme dans le système /mnt : monter tous les différents de système de fichier temporaire /media : monter les média amovible '(clé usb, cd-rom, ID périphérique)' /dev : Fichier virtuel, pas besoin de partitions btrfs : système de fichier plus moderne + révolutionnaire + snapshot ext : extend file system reseirfs : premier système de fichier sur linux plus accessible aujd jfs : système de fichier constante et super éléver + gestionnaire de base de donnée xfs : système de fichier constante et super élever particulièrement sur les entrées et sorties // favorisation pour les grosses hiérarchie à grosse données; meta donnée lente fat: file allocation table ntfs : new technologie file system hfs : héarchie file système udf : permet de gérer la création, suppression et modification des fichiers de disque optiques dumpe2fs : récupérer des informations tune2fs : modifier certain paramètre lié aux information récupérer de deumpe2fs debugfs : relis tune2fs + dumpe2fs + autres outils = débugger un système de fichier xfs\_metadump : permet de copié les métadonnées du système de fichier vers un fichier vim /etc/cups/cupsd.conf : configuration du pool cups : Imprimante syslogd = log application klogd = log pour le kernel k Tous les messages d'erreur a fouiller : Authpriv, cron, kern, lpr, mail, new, syslog, user, uucp /var/log Logger = permet d'enregistrer des information dans le /var/log/syslog /etc/init.d/atd "stop"or "start" :pour mettre en actif nos tache planifié # Firewall # CommandePartition Racine pleine à 100%.
[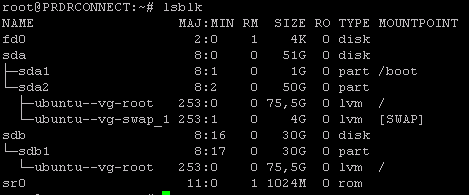](https://cavallone.fr/uploads/images/gallery/2024-10/4pDuRZ93PefFj4Hs-image.png) Augmenter la taille du deuxième disque dans Vmware: [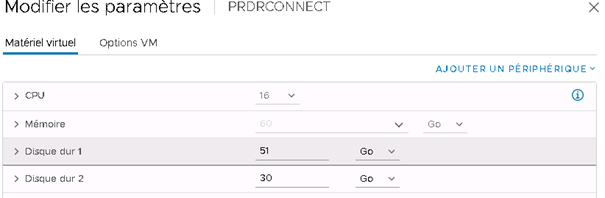](https://cavallone.fr/uploads/images/gallery/2024-10/JS3R9rSkY1HtuZWY-image.png) Après ajout : [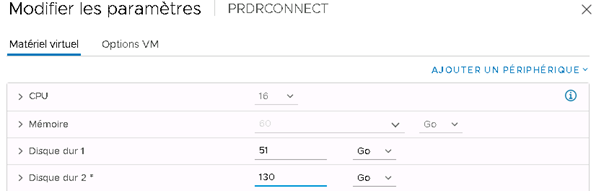](https://cavallone.fr/uploads/images/gallery/2024-10/jfQQvT0HA4z7xUiI-image.png) Puis prendre un snapshot du serveur. pvdisplay [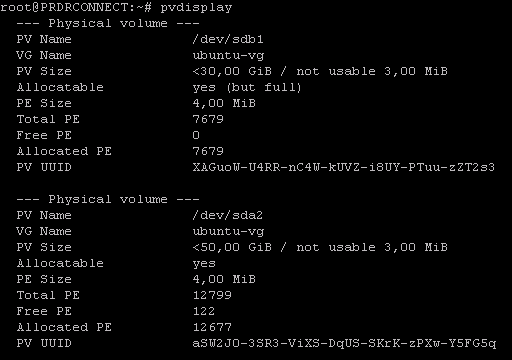](https://cavallone.fr/uploads/images/gallery/2024-10/srzllWauFq3CYdWJ-image.png) ls /sys/class/scsi\_device/ [](https://cavallone.fr/uploads/images/gallery/2024-10/IE1LjPbrMJkiFkld-image.png) echo 1 > /sys/class/scsi\_device/2\\:0\\:0\\:0/device/rescan echo 1 > /sys/class/scsi\_device/32\\:0\\:0\\:0/device/rescan echo 1 > /sys/class/scsi\_device/32\\:0\\:1\\:0/device/rescan fdisk -l [](https://cavallone.fr/uploads/images/gallery/2024-10/udBNKSVZz85DC0kM-image.png) pvscan [](https://cavallone.fr/uploads/images/gallery/2024-10/BZfD8L4i7TrSg030-image.png) cfdisk /dev/sdb [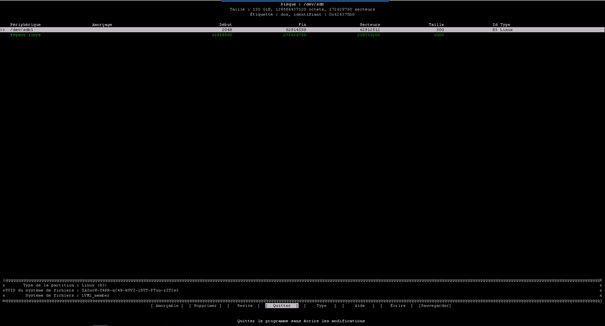](https://cavallone.fr/uploads/images/gallery/2024-10/xrvQxgANPOyTsQYZ-image.png) Resize puis faire entrée [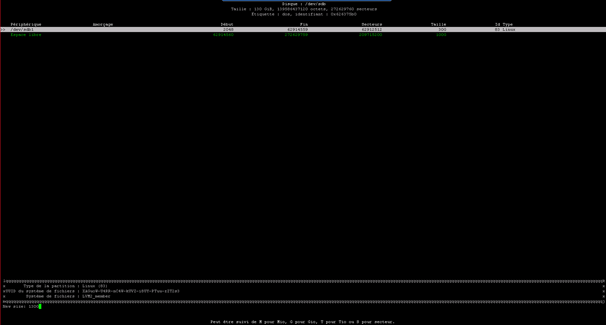](https://cavallone.fr/uploads/images/gallery/2024-10/3S3xcw4uz0nMD7uG-image.png) [](https://cavallone.fr/uploads/images/gallery/2024-10/qYEMwdMREuRQGz81-image.png) Sélectionner Ecrire et saisir oui [](https://cavallone.fr/uploads/images/gallery/2024-10/jRbaVUowsXVVVJ1D-image.png) Quitter Partprobe Pvscan [](https://cavallone.fr/uploads/images/gallery/2024-10/ZvY12r4vIEJGXmAD-image.png) [](https://cavallone.fr/uploads/images/gallery/2024-10/JAWMuOIRsPjhcg2j-image.png) pvresize /dev/sdb1 [](https://cavallone.fr/uploads/images/gallery/2024-10/8JhQLMiYrtzTkTG1-image.png) Pvs [](https://cavallone.fr/uploads/images/gallery/2024-10/AdfVI0SdJLfI3ckX-image.png) Vgs [](https://cavallone.fr/uploads/images/gallery/2024-10/PmllsSQxpJE9TaMO-image.png) lvs [](https://cavallone.fr/uploads/images/gallery/2024-10/q03KFl2tWIpl4jNW-image.png) Df -h [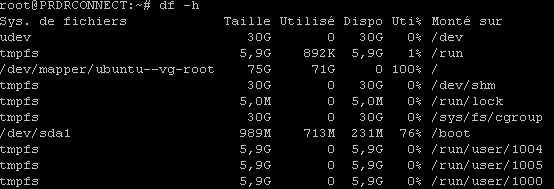](https://cavallone.fr/uploads/images/gallery/2024-10/rH3BqLXkqVEaa5od-image.png) lvresize -l +100%FREE /dev/mapper/ubuntu--vg-root [](https://cavallone.fr/uploads/images/gallery/2024-10/7XLNPxoeVg1waH6Y-image.png) Lvs [](https://cavallone.fr/uploads/images/gallery/2024-10/oQEZzQfnV0ctLiTw-image.png) resize2fs -p /dev/mapper/ubuntu--vg-root [](https://cavallone.fr/uploads/images/gallery/2024-10/OxWTwDqkZIbqy1Rt-image.png) Df -h [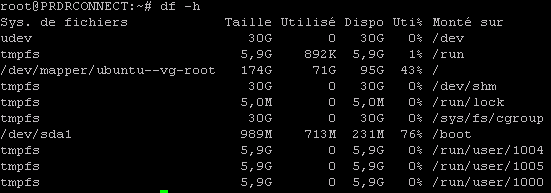](https://cavallone.fr/uploads/images/gallery/2024-10/897mutawleVjZWV8-image.png)Tout est bon les volumes physiques et logiques ont été augmentés. Bravo !!!! Penser à supprimer le snapshot après.
# monter un LVM via 2 playbook Playbook monter un lvm sur /data ```yaml --- - name: Post-configure machine hosts: virtual_machines become: yes gather_facts: yes vars: data_devices: - /dev/sdb tasks: - name: Create volume group 'Vodata' community.general.lvg: vg: Vodata pvs: "{{ data_devices|join(',') }}" - name: Create logical volume 'data' community.general.lvol: lv: data vg: Vodata size: +100%FREE resizefs: yes force: yes - name: Format /data community.general.filesystem: dev: /dev/VGdata/data fstype: xfs opts: "{{ additional_options }}" vars: additional_options: >- -i metadata_csum,64bit {% if ansible_kernel.version|version_compare('3.18', '>=') %} -i delalloc {% endif %} - name: Mount /data ansible.posix.mount: path: /data src: LABEL=DATA fstype: xfs opts: rw,defaults passno: 2 state: mounted ``` \------------------------------------------------------------------------------------------- Playbook gestion création entre 2 stockage de lvm : playbook pour la certification RHCE. ```yaml --- name: create lvm in the system become: true hosts: all tasks: - name: Create LVM data as 1500MB block: - name: Create LVM data community.general.lvol: vg: research lv: data size: 1500M when: ansible_lvm.vgs.research.size_gb > 1500 - name: block: - debug: msg: "The Required size of lv is less then 1500 MB so creating a 800 MB LVM" when: ansible_lvm.vgs.research.size_gb < 1500 and ansible_lvm.vgs.research.size_gb > 800 - name: Create LVM Data as 800MB community.general.lvol: vg: research lv: data size: 800M when: ansible_lvm.vgs.research.size_gb < 1500 - name: create file system on lvm block: - community.general.filesystem: fstype: ext4 dev: /dev/research/data when: ansible_lvm.vgs.research is defined - name: block: - debug: msg: "The Required Volume Group does not exits in this system" when: ansible_lvm.vgs.research is not defined ``` # Test remplissage d'un disque Remplir un disque : ```bash dd if=/dev/zero of=/data/testfile bs=1M count=9500 ``` # Helm # Installation HelmCLI Installation helm, regarder si vous allez bien pointé sur là dernière version d'helm par rapport à la publication de cette rubrique. ```bash curl -fsSL -o get_helm.sh https://raw.githubusercontent.com/helm/helm/main/scripts/get-helm-3 chmod 700 get_helm.sh ls /usr/local/bin/helm export PATH=$PATH:/usr/local/bin ./get_helm.sh ``` TEST HELM INSTALL : ```bash helm version helm repo add stable https://charts.helm.sh/stable helm repo update ``` # Helm commande Commande helm pour tester son template values sur un cluster openshift ou kubernetes : helm template onyx ./ -f values-recette.yaml --namespace onyx-recette --debug **Décomposition de la commande:** - **`helm template`:** C'est la commande principale qui indique à Helm que nous voulons générer un template. - **`onyx`:** C'est le nom du chart Helm que vous souhaitez utiliser comme base pour générer le manifest. Un chart Helm est un package qui contient les fichiers de configuration nécessaires pour déployer une application sur Kubernetes. - **`./`:** Ce point indique le répertoire courant. Cela signifie que le chart Helm `onyx` se trouve dans le répertoire où vous exécutez cette commande. - **`-f values-recette.yaml`:** Ce drapeau indique à Helm d'utiliser le fichier `values-recette.yaml` comme fichier de valeurs. Ce fichier contient les valeurs spécifiques à votre déploiement, comme les noms d'hôtes, les ports, etc. - **`--namespace onyx-recette`:** Ce drapeau spécifie que le manifest généré sera déployé dans l'espace de noms `onyx-recette` de votre cluster Kubernetes. - **`--debug`:** Ce drapeau active le mode débogage, ce qui signifie que Helm affichera plus d'informations sur le processus de génération du template. \------------------------------------------------------------------------------------------------------------------------------------------------------ d'autre commande arrive seront placée par la suite